Create content lists which you can attach to screens or add into existing play list
note: content lists can be added to existing play lists acting like a container
In order to attach content to a list it must be ingested or load into the nfintyX
Loading or ingesting content is done using “My Folder” in the home TAB
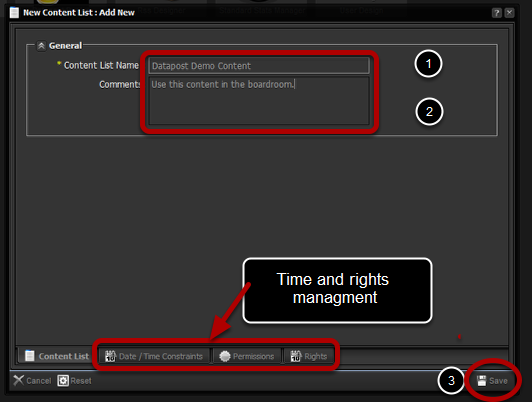
Click on new content lists

Create a name for the new list

- Give the list a name –
- Add any further information in the comments box – this is not compulsory
- You can simple save at this point and continue to the next screen.
If you would like to add further information like
- Data and time constraints
- Permissions
- RIghts
This can be added at any point but it is advised to add this information when creating the list or data object.
Adding content to list
- You will notice a tab open next to the screen works tab.
- The list will be empty.
You will need to search for content using the search tools on the left of the interface
Searching for content

Click on the drop down tab and select a library
Select the library

For this example we will use the Auto Default Video library
(note: The Library’s are setup by administrators and will be setup to fit in with your work flow or process)
Selecting the search type

Choose your option, in this case we will use the general search function.
Key Word

Enter the Key Word and click search
Results

The results will be displayed relating to your query you now have a number of ways to add the content to your content list
- Drag content to the files you want to use to the clip board – you will drag them from your clip board to create you list
- Save your query result and use it to populate your list, this is very useful when you want to input a large number of media items
Dragging content to Clipboard

Simple click on file and drag to clipboard
Add content to your list

- Click on your new content list
- Click and drag your media files into the list you can only
- You can select multiple files and drag them into your list
Set the last clip to loop back to top of the list

- Right click on the arrow
- A drop down will appear
- Select list actions
- Six options will be offered to the user – in this lesson we want to add a loop.
- select the loop function
Loop function active

This function will instruct the media player to begin from the top of the list.
Note: there is no restriction to the amount of clips you can add to a list.
This basic list can now be added to a screen layer and can be modified from the screen layer at anytime.